To edit a section of your book, hover your mouse over heading or button of the content and click Edit to bring up the Text Editor.
More information can be found at: https://guide.pressbooks.com/chapter/visual-text-editors/
The visual editor is the default editor. It is a WYSIWYG (What You See Is What You Get) interface that allows you to see styling and formatting as they are applied.
Most menu options in Books4Languages’ Visual Editor are self-explanatory and will be familiar to you. A few tips:
This interface also includes a toolbar that the top of the editor. While most options are straightforward, there are a range of buttons whose functions might not be obvious at first. Below is a guide to each of the toolbar functions, and where you’ll find them.
NOTE: Microsoft Word has a very bad habit of bringing in a whole lot of crappy markup that styles your document for MS Word but does terrible things in ebooks and WebTextBooks for instance, making your fonts too small or too big or the wrong color etc.
So, it’s a good idea to Paste as text (21) your content if you are coping content from any other place rather than Books4Languages… unless you are very sure you know what are you coping in your book.
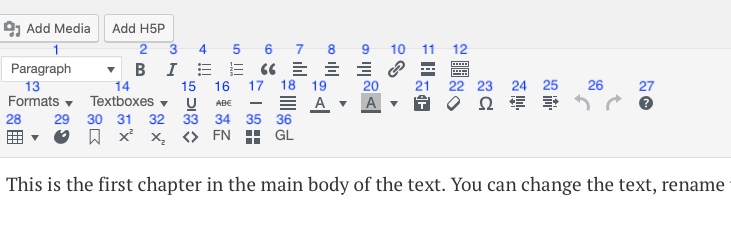
Toolbar options:
- Paragraph styles dropdown menu: choose from normal paragraph style, six different heading styles, or preformatted text
- Bold
- Italics
- Bulleted list
- Numbered list
- Blockquote
- Left-align
- Center-align
- Right-align
- Link
- Read more
- Toolbar toggle
- Formats dropdown menu: choose from several text indent and tracking options, as well as pullquote options
- Textboxes dropdown menu: choose from a variety of plain textboxes or predesign educational textboxes (read more here)
- Underline
Strikethrough- Horizontal line
- Justify
- Text color
- Text background color
- Paste as text
- Clear formatting
- Special character
- Decrease indent
- Increase indent
- Undo and Redo
- Keyboard shortcuts guide
- Tables (read more here)
- Apply Class
- Anchor
- Superscript
- Subscript
Code- Footnote[1] (read more here)
- Convert MS footnotes
- Glossary
- (read more here)
You can highlight a section of existing content and then click a tool on the toolbar to add formatting to that section. Alternatively, select the tool first, and then add new formatted content.
NOTE: The visual editor toolbar displays all formatting options by default. You can collapse the second and third rows of tools by clicking the toggle button (12)
Headings
Do not try to work within the text box of the visual editor to apply fancy formatting (such as bolding or enlarging headings). Instead, use the dropdown menus labeled Paragraphs and Formats to apply styles to your book. This will ensure the best and cleanest output.
DONT: Style headings with Bold instead of Heading tags.
Nest headings by their rank (or level). The most important heading has the rank 1 (<h1>), the least important heading rank 6 (<h6>). Headings with an equal or higher rank start a new section, headings with a lower rank start new subsections that are part of the higher ranked section.
Skipping heading ranks can be confusing and should be avoided where possible: Make sure that a <h2> is not followed directly by an <h4>, for example. It is ok to skip ranks when closing subsections, for instance, a <h2> beginning a new section, can follow an <h4> as it closes the previous section.
More information can be found at: https://www.w3.org/WAI/tutorials/page-structure/headings/